Running and Yoga: 5 moves to help you recover easily after running!

20 min read
Tight hips and hamstrings are a common issue for runners. Yoga can help! Try these 5 moves after your next run to help you recover.
If you’re a runner, you know how important it is to have a good recovery routine. Here are 5 yoga moves that will help you recover easily after running.
In all sports, running and yoga are as harmonious as milk and coffee. During running, people’s muscle stretching and unbalanced force can easily lead to sprains or muscle tension, and yoga can alleviate these negative symptoms. After running, perform the following five simple actions to easily stretch and recover.
1. The Pigeon Pose
Pigeon pose is a yoga pose that is said to provide many benefits. These benefits include increasing flexibility in the hips, improving digestion, and reducing stress and anxiety.
The Pigeon Pose, known as Eka Pada Rajakapotasana in Sanskrit, is a popular yoga posture celebrated for its deep stretch in the hips, thighs, and lower back. It is widely used in yoga practices for its ability to improve flexibility, relieve tension, and promote relaxation. Whether you’re a seasoned yogi or a beginner, the Pigeon Pose offers significant benefits when practiced correctly.
How to Perform the Pigeon Pose
-
Begin in Downward-Facing Dog:
- Start in the Downward-Facing Dog position, with your hands and feet on the mat, hips lifted toward the ceiling, and your body forming an inverted “V” shape.
-
Bring One Knee Forward:
- Inhale deeply. As you exhale, bring your right knee forward and place it behind your right wrist. The right ankle should be positioned near the left wrist, with the shin as parallel to the front of the mat as comfortable.
-
Extend the Back Leg:
- Slide your left leg straight back, allowing the top of your foot to rest on the mat. Your hips should square to the front, ensuring that your weight is evenly distributed between both hips.
-
Lower Your Torso:
- With an inhale, lengthen your spine, and as you exhale, slowly walk your hands forward, lowering your torso over your front leg. You can rest on your forearms, stack your hands to rest your forehead, or extend your arms fully in front of you.
-
Hold the Pose:
- Stay in this position for 5 to 10 breaths, allowing your hips and thighs to relax deeper into the stretch with each exhale.
-
Return to Downward-Facing Dog:
- To exit the pose, press your hands into the mat and lift your torso. Tuck your back toes under, lift your hips, and step back into Downward-Facing Dog. Repeat on the other side.
Benefits of the Pigeon Pose
-
Deep Hip Stretch: The Pigeon Pose is one of the most effective yoga poses for opening the hips. It targets the glutes, piriformis, and hip flexors, making it an excellent stretch for those with tight hips due to sitting for long periods or from activities like running and cycling.
-
Relief from Lower Back Pain: By stretching the hip flexors and rotating the thighs outward, the Pigeon Pose can help alleviate tension in the lower back, reducing pain and discomfort.
-
Improved Flexibility: Regular practice of this pose can increase flexibility in the hips and legs, contributing to better overall mobility.
-
Stress Relief: The deep stretch and forward fold in the Pigeon Pose encourage relaxation and can help reduce stress and anxiety by promoting the release of tension stored in the hips.
-
Enhanced Circulation: By holding the pose and breathing deeply, you stimulate blood flow to the hips and lower body, which can aid in muscle recovery and overall circulation.
Modifications and Variations
-
Pigeon Pose with a Bolster or Blanket: If you find it difficult to lower your hips to the mat, place a bolster or folded blanket under your hips for support. This modification helps maintain alignment and reduces strain on the lower back and knees.
-
Reclined Pigeon Pose: For those with knee or hip issues, the Reclined Pigeon Pose (also known as Figure Four Pose) is a gentler alternative. Lie on your back, cross one ankle over the opposite knee, and gently pull the non-crossed leg toward your chest.
-
King Pigeon Pose: For advanced practitioners, King Pigeon Pose (Eka Pada Rajakapotasana II) involves bending the back leg and reaching back to grab the foot with both hands. This variation adds a deep quadriceps stretch and requires greater flexibility and balance.
Precautions
-
Knee Pain: If you experience any knee pain while performing the Pigeon Pose, ease out of the posture and consider trying the Reclined Pigeon Pose or using props for support.
-
Lower Back Sensitivity: Ensure your back leg is extended straight and your hips are squared to avoid twisting or straining the lower back.
-
Warm-Up: Always warm up your body with some gentle stretches or a few rounds of Sun Salutations before attempting the Pigeon Pose to prevent injury.
The Pigeon Pose is a powerful stretch that offers numerous benefits, from increased flexibility to stress relief. With proper technique and mindful practice, it can become a key part of your yoga routine, helping you achieve greater physical and mental well-being.
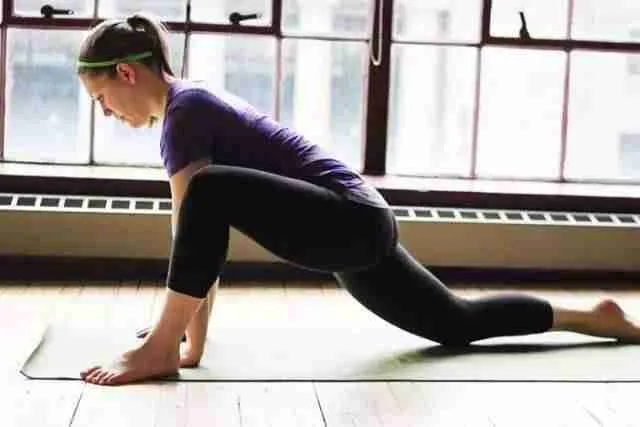
2. The Runner’s Lunge
The Runner’s Lunge, also known as Utthita Ashwa Sanchalanasana in Sanskrit, is a foundational yoga pose that provides a deep stretch to the hips, legs, and spine. It is often used as a warm-up or transition pose in yoga sequences, but it also serves as a powerful stretch on its own, particularly for runners and athletes. This pose helps to open up the hip flexors, strengthen the legs, and improve overall balance and stability.
How to Perform the Runner’s Lunge
-
Start in Downward-Facing Dog:
- Begin in the Downward-Facing Dog position, with your hands and feet on the mat, hips lifted high, and your body forming an inverted “V” shape.
-
Step One Foot Forward:
- Inhale deeply. As you exhale, step your right foot forward between your hands, aligning your knee directly over your ankle. Keep your back leg extended straight behind you, with the top of your foot resting on the mat or with your toes tucked under for more stability.
-
Align Your Hips:
- Square your hips to the front of the mat, ensuring that both hips are level. Engage your core to support your lower back and maintain stability.
-
Lengthen Your Spine:
- With an inhale, lengthen your spine by reaching the crown of your head forward and lifting your chest slightly. Keep your fingertips or palms pressed into the mat for support.
-
Hold the Pose:
- Stay in this position for 5 to 10 breaths, allowing your hips and legs to relax deeper into the stretch with each exhale. Focus on maintaining a long spine and steady breath.
-
Switch Sides:
- To exit the pose, step back into Downward-Facing Dog, then repeat the stretch on the opposite side by stepping your left foot forward.
Benefits of the Runner’s Lunge
-
Hip Flexor Stretch: The Runner’s Lunge is highly effective in stretching the hip flexors, which can become tight from prolonged sitting or intense physical activity. This stretch helps to open the hips, improving flexibility and range of motion.
-
Leg Strengthening: This pose engages the quadriceps, hamstrings, and calves, building strength and endurance in the legs. It also activates the glutes, supporting overall lower body strength.
-
Spine Lengthening: By encouraging a long spine and upright posture, the Runner’s Lunge helps to stretch the back muscles, alleviating tension in the lower back and improving posture.
-
Balance and Stability: Maintaining balance in this lunge position enhances core stability and strengthens the muscles around the hips and knees, reducing the risk of injury in running and other activities.
-
Enhanced Circulation: The deep stretch and active engagement of muscles in the Runner’s Lunge promote increased blood flow, which aids in muscle recovery and overall circulation.
Modifications and Variations
-
Low Lunge (Anjaneyasana): For a deeper stretch and added balance challenge, drop your back knee to the mat, coming into a Low Lunge. This variation focuses more on stretching the hip flexors and quadriceps of the back leg.
-
Runner’s Lunge with Twist: Add a twist to the lunge by placing your opposite hand on the mat and extending your other arm toward the ceiling. This variation enhances the stretch in the spine and improves balance.
-
Runner’s Lunge with a Block: If you have tight hips or hamstrings, place yoga blocks under your hands to bring the floor closer, allowing you to maintain proper alignment without straining.
Precautions
-
Knee Alignment: Ensure your front knee is aligned directly over your ankle to prevent strain on the knee joint. Avoid letting the knee extend past the toes.
-
Lower Back Sensitivity: Keep your back leg active and your core engaged to avoid collapsing into your lower back, which can cause discomfort or injury.
-
Hip Flexibility: If your hips are tight, move into the pose slowly and use props such as blocks or a rolled-up towel under your back knee for support.
The Runner’s Lunge is a versatile and powerful pose that offers numerous benefits for flexibility, strength, and stability. Whether used as a warm-up, cool-down, or standalone stretch, incorporating this pose into your routine can greatly enhance your physical performance and overall well-being.
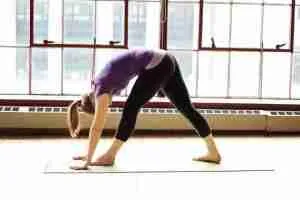
3. The Pyramid Pose
Pyramid pose is a standing yoga pose that is excellent for beginners. The pose gets its name from the shape of the body when it is in the correct alignment. The hips and shoulders form a right angle, and the arms are extended straight out from the shoulders.
The Pyramid Pose, known as Parsvottanasana in Sanskrit, is a standing yoga posture that offers a deep stretch to the hamstrings, hips, and spine. It is a forward-bending pose that also helps to improve balance and stability. The Pyramid Pose is particularly beneficial for athletes, runners, and anyone looking to increase flexibility in the legs and hips while also promoting mental focus and calmness.
How to Perform the Pyramid Pose
-
Start in Mountain Pose (Tadasana):
- Begin by standing tall at the front of your mat in Mountain Pose, with your feet together, arms by your sides, and weight evenly distributed.
-
Step Back with One Foot:
- Step your left foot back about 3 to 4 feet, keeping both feet pointing forward. Your back foot should be flat on the mat with the heel grounded. Align your feet so that your heels are in line with each other, or slightly wider apart if needed for balance.
-
Square Your Hips:
- Square your hips to the front of the mat, ensuring they are level. This alignment is key to getting the full benefit of the pose and preventing strain on your lower back.
-
Lengthen Your Spine:
- Inhale and lengthen your spine, reaching your arms overhead. As you exhale, hinge at the hips and begin to fold forward over your front leg, keeping your spine long.
-
Lower Your Hands:
- Bring your hands to the floor on either side of your front foot, or rest them on your shin, a yoga block, or your hips if the floor is not accessible. Keep your front leg straight, but do not lock your knee.
-
Deepen the Stretch:
- With each exhale, gently deepen the forward fold, allowing your chest to come closer to your front thigh. Hold the pose for 5 to 10 breaths, focusing on maintaining length in your spine and deepening the stretch in your hamstrings.
-
Switch Sides:
- To exit the pose, slowly rise back up to standing, step your feet together, and then repeat the pose on the other side by stepping your right foot back.
Benefits of the Pyramid Pose
-
Hamstring Stretch: The Pyramid Pose provides an intense stretch to the hamstrings, helping to increase flexibility and reduce tightness in the back of the legs. This is particularly beneficial for those who sit for long periods or engage in activities like running and cycling.
-
Hip Opener: By aligning the hips and maintaining a forward fold, this pose helps to open the hips and release tension, improving overall mobility.
-
Spinal Lengthening: The forward bend in Pyramid Pose encourages lengthening of the spine, which can help alleviate tension in the back and improve posture.
-
Improved Balance and Stability: Balancing in the Pyramid Pose requires engagement of the core and leg muscles, enhancing stability and coordination.
-
Calming Effect: Like many forward bends, the Pyramid Pose promotes a sense of calm and relaxation. It can help reduce stress and anxiety by encouraging deep, steady breathing and mindfulness.
Modifications and Variations
-
Hands on Blocks: If reaching the floor is challenging, place your hands on yoga blocks to bring the ground closer. This allows you to maintain proper alignment without straining.
-
Bent Knee Variation: If you have tight hamstrings, slightly bend your front knee to avoid overstretching and straining the muscles. As your flexibility increases, you can work towards straightening the leg.
-
Reverse Prayer Hands (Paschima Namaskarasana): For a deeper shoulder and chest stretch, bring your hands into a reverse prayer position behind your back as you fold forward. This variation also enhances balance and concentration.
Precautions
-
Hamstring Sensitivity: Be mindful of overstretching the hamstrings, especially if they are tight. Start with a slight bend in the front knee and gradually work towards a deeper stretch.
-
Lower Back Issues: If you have lower back problems, avoid rounding your back in the forward fold. Focus on keeping your spine long and engaging your core to support your back.
-
Balance Challenges: If balance is difficult, try widening your stance by moving your feet hip-width apart. This can provide more stability and make the pose more accessible.
The Pyramid Pose is a powerful posture that offers a deep stretch and a range of benefits for the body and mind. Whether used as part of a yoga sequence or as a standalone stretch, it can help increase flexibility, improve posture, and promote relaxation.
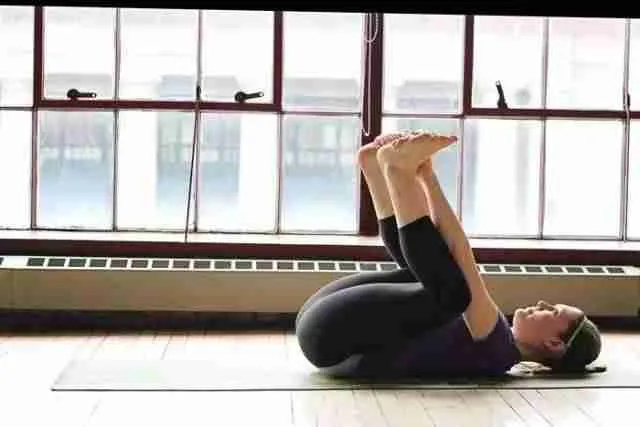
4. The Happy Baby Pose
Happy Baby Pose is a restorative yoga pose that is often used as a final relaxation pose in yoga practice. It can be performed by anyone, regardless of their yoga experience.
The benefits of Happy Baby Pose include reducing stress and fatigue, improving circulation, and stimulating the digestive and reproductive systems. To enter Happy Baby Pose, lie on your back with your knees bent and your feet flat on the floor.
The Happy Baby Pose, known as Ananda Balasana in Sanskrit, is a relaxing and gentle yoga posture that is often used at the end of a yoga practice to promote relaxation and release tension. This pose mimics the natural, carefree movements of a baby, offering a deep stretch to the hips, inner thighs, and lower back. It is a favorite for both beginners and advanced practitioners due to its simplicity and soothing effects.
How to Perform the Happy Baby Pose
-
Start by Lying on Your Back:
- Begin by lying flat on your back on a yoga mat with your legs extended and arms resting by your sides. Take a moment to relax and connect with your breath.
-
Bend Your Knees Toward Your Chest:
- Inhale deeply, and as you exhale, bend your knees and bring them toward your chest. Your knees should be wider than your torso, and your feet should be flexed.
-
Grab the Soles of Your Feet:
- Reach up with your hands to grab the outer edges of your feet, holding onto them gently. If you cannot reach your feet, you can hold onto your ankles or shins.
-
Open Your Hips:
- Gently pull your feet down toward the mat, allowing your knees to come closer to your armpits. Keep your ankles directly over your knees, creating a 90-degree angle with your legs. Your shins should be perpendicular to the floor.
-
Rock Side to Side (Optional):
- If it feels comfortable, you can rock gently from side to side, massaging your lower back against the mat. This movement can help to further release tension in the lower back and hips.
-
Hold the Pose:
- Stay in the Happy Baby Pose for 5 to 10 breaths, focusing on deepening your breath and relaxing your entire body. Allow your hips, thighs, and lower back to open and soften with each exhale.
-
Release the Pose:
- To exit the pose, release your feet and slowly extend your legs back to the mat. Rest for a moment before continuing with your practice or transitioning to another pose.
Benefits of the Happy Baby Pose
-
Hip Opener: The Happy Baby Pose is an excellent stretch for the hips, helping to increase flexibility and release tightness in the inner thighs and groin area.
-
Lower Back Relief: By gently pulling the knees toward the chest and rocking side to side, this pose can help alleviate tension and discomfort in the lower back.
-
Stress Reduction: The calming nature of this pose promotes relaxation and stress relief. It encourages deep, mindful breathing, which can help reduce anxiety and promote a sense of peace.
-
Improved Flexibility: Regular practice of the Happy Baby Pose can enhance flexibility in the hips and legs, making it easier to perform other yoga poses and daily activities.
-
Connection to Breath: This pose is often used as a restorative pose to reconnect with your breath, making it an excellent way to wind down at the end of a yoga session.
Modifications and Variations
-
Use a Strap: If you have difficulty reaching your feet, use a yoga strap around the arches of your feet. Hold onto the strap with your hands, allowing you to maintain the stretch without straining.
-
One-Legged Happy Baby Pose: For a gentler variation, try the One-Legged Happy Baby Pose by extending one leg along the mat while holding the other foot in the traditional Happy Baby position. This can help to gradually open up the hips and lower back.
-
Reclined Bound Angle Pose (Supta Baddha Konasana): For a similar but different stretch, bring the soles of your feet together and let your knees drop out to the sides. This pose also opens the hips and can be a soothing alternative.
Precautions
-
Knee Sensitivity: If you have knee issues, be gentle when pulling your feet down toward the mat. Avoid overstretching or putting too much pressure on the knees.
-
Lower Back Pain: While this pose is generally soothing for the lower back, those with severe lower back pain or injury should approach the pose with caution and avoid excessive rocking or pulling.
-
Pregnancy: Pregnant women should avoid deep forward bends or poses that compress the abdomen. A gentler variation with a wider stance or skipping this pose altogether might be advisable.
The Happy Baby Pose is a delightful and accessible yoga posture that offers numerous physical and mental benefits. Whether you’re looking to open your hips, relieve lower back tension, or simply relax, incorporating this pose into your routine can enhance your overall well-being.
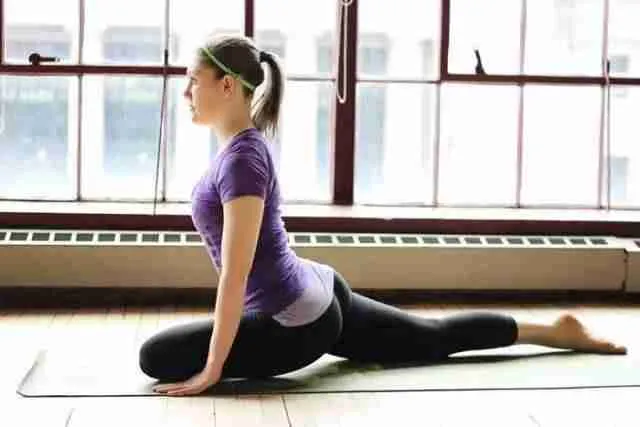
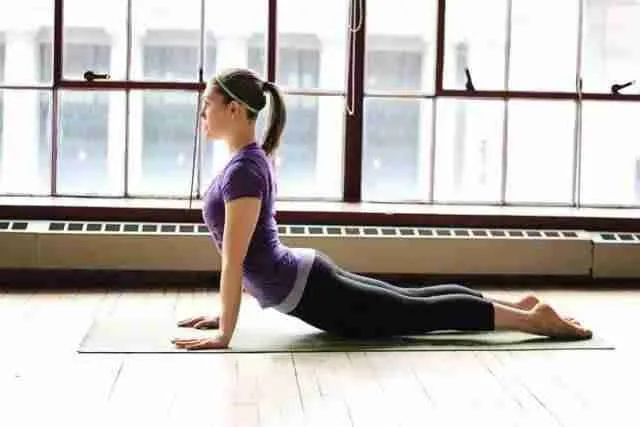
5. The Upward Facing Dog
Pose The Upward Facing Dog Pose is a standing yoga posture that is often performed as part of a sun salutation sequence. The pose gets its name from the fact that the body resembles a dog stretching its back upwards. The Upward Facing Dog Pose is a great way to stretch the entire body, including the spine, chest, and legs.
The Upward-Facing Dog, known as Urdhva Mukha Svanasana in Sanskrit, is a foundational yoga pose that provides a deep backbend, strengthens the upper body, and opens the chest. It is often used in yoga sequences like Sun Salutations and is considered a key pose for building flexibility and resilience in the spine. This posture energizes the body and helps counteract the effects of sitting or hunching over, making it an essential pose for overall health and vitality.
The pose also helps to open up the hips and shoulders, and can increase flexibility in the hamstrings. To perform the Upward Facing Dog Pose, start in a standing position with your feet together. Take a deep breath in and, as you exhale, bend forward at the waist and place your hands on the floor in front of you.
As you inhale, press your hands into the floor and lift your torso and legs off the ground. Keep your legs straight and your core engaged as you lift yourself up. Hold the Upward Facing Dog Pose for a few breaths before slowly lowering back down to the floor. The Upward Facing Dog Pose is a great way to stretch and strengthen the entire body.
The pose can also help to improve flexibility, and can be a great addition to any yoga or fitness routine.
How to Perform the Upward-Facing Dog
-
Start by Lying Face Down:
- Begin by lying face down on your yoga mat with your legs extended straight back, the tops of your feet resting on the mat, and your hands placed under your shoulders.
-
Engage Your Legs and Core:
- Press the tops of your feet firmly into the mat, and engage your quadriceps and core muscles. This engagement lifts your kneecaps off the mat and stabilizes your lower body.
-
Press Into Your Hands:
- Inhale deeply, and as you exhale, press firmly into your hands to lift your chest and upper body off the mat. Straighten your arms, but keep a slight bend in the elbows to avoid hyperextension. Your hands should be positioned directly under your shoulders or slightly forward.
-
Lift Your Thighs Off the Mat:
- As you lift your chest, continue to engage your legs so that your thighs lift off the mat. Only the tops of your feet and your hands should be touching the ground. This action helps to protect your lower back and deepen the stretch in your chest and shoulders.
-
Open Your Chest and Look Forward:
- Roll your shoulders back and down, opening your chest and drawing your shoulder blades toward each other. Lift your gaze slightly upward, but avoid straining your neck by keeping your head aligned with your spine.
-
Hold the Pose:
- Hold the Upward-Facing Dog for 5 to 10 breaths, maintaining a steady and even breath. Focus on lengthening your spine and expanding your chest with each inhale.
-
Release the Pose:
- To exit the pose, gently lower your body back down to the mat, or transition directly into Downward-Facing Dog by tucking your toes under and lifting your hips toward the ceiling.
Benefits of the Upward-Facing Dog
-
Spine Strengthening: The Upward-Facing Dog is a powerful pose for strengthening the muscles along the spine, particularly the lower back. It helps to build stability and support in the core and back, which can alleviate back pain and improve posture.
-
Chest and Shoulder Opener: This pose stretches the chest, shoulders, and abdomen, counteracting the effects of poor posture and helping to open the front body. It’s especially beneficial for those who spend a lot of time sitting or hunching over.
-
Improved Posture: Regular practice of this pose can enhance your overall posture by encouraging spinal extension and proper alignment of the shoulders.
-
Increased Flexibility: The Upward-Facing Dog improves flexibility in the spine, shoulders, and hip flexors. Over time, it can help you achieve greater range of motion in these areas.
-
Energy Boost: As a backbend, this pose stimulates the nervous system and can increase energy levels, making it a great way to start the day or invigorate your practice.
Modifications and Variations
-
Cobra Pose (Bhujangasana): For a gentler variation, practice Cobra Pose instead. In Cobra Pose, the thighs and lower body remain on the mat, and the backbend is less intense, making it more accessible for beginners or those with lower back issues.
-
Supported Upward-Facing Dog: If you find it difficult to keep your thighs off the mat, place a rolled-up blanket under your thighs for support. This modification helps you maintain proper alignment without straining your lower back.
-
One-Legged Upward-Facing Dog: For a more advanced variation, try lifting one leg off the mat while holding the pose. This adds a balance challenge and increases the intensity of the stretch in the lifted leg.
Precautions
-
Lower Back Sensitivity: If you have a sensitive or injured lower back, approach this pose with caution. Focus on engaging your core and legs to support your lower back, and consider practicing Cobra Pose as a gentler alternative.
-
Wrist Issues: Those with wrist pain or carpal tunnel syndrome should be cautious in this pose, as it places significant weight on the wrists. Modify by placing your forearms on the mat in Sphinx Pose or using a yoga wedge to reduce wrist pressure.
-
Neck Strain: Avoid throwing your head back in this pose, as it can strain the neck. Instead, keep your gaze forward or slightly upward with a long neck, aligned with the rest of your spine.
The Upward-Facing Dog is a dynamic and energizing pose that offers a wealth of benefits for strength, flexibility, and overall vitality. By practicing this pose regularly and with proper alignment, you can enhance your yoga practice and support your body’s health and well-being.
Conclusion
The article offers 5 moves to help runner’s stretch and recover after running. The moves are easy to do and don’t require any special equipment.
By incorporating these moves into your post-run routine, you can help your body recover more quickly and avoid injuries.